So, you’ve got a dope video ready to roll, complete with trending audio that’s catching everyone’s ear. Using popular sounds can seriously boost your reel’s reach because Instagram’s algorithm favors trending audio. However, simply adding Instagram’s audio without adjusting it properly can mess up your carefully edited sound and may even lead to your video being removed due to copyright issues. To keep your video sounding great and avoid any copyright problems, follow these steps.
Let’s dive into how to use trending sounds the right way and make sure your reel gets the spotlight it deserves.
Step 1: Upload Your Video to Instagram
Start by uploading your video as usual. Choose it from your camera roll and make any final tweaks. Most people hit “Share” here, but if you want to really spice things up, you need to take a few more steps.
Step 2: Add Audio with Instagram’s “🎵 Audio” Feature
After you’ve selected your video, tap the “🎵 Audio” icon to browse Instagram’s music library. Even if your video already has audio, Instagram’s algorithm favors content that incorporates its built-in tools. Adding music directly through Instagram not only boosts your video’s visibility but also keeps it safe from copyright issues.
Step 3: Find and Apply the Exact Track
Search for the track used in your video. Since your video was edited with a specific song, you’ll want to find and apply the same track from Instagram’s music library. This ensures that the timing and feel of the video remain consistent with the original edit.
Step 4: Select the Audio and Click “Next”
Once you’ve picked the right sound, select it and tap “Next.” Instagram will replace the original audio in your video with the new track, meaning your video will be muted while the added sound plays. Don’t worry, though—you can adjust this to maintain your original audio.
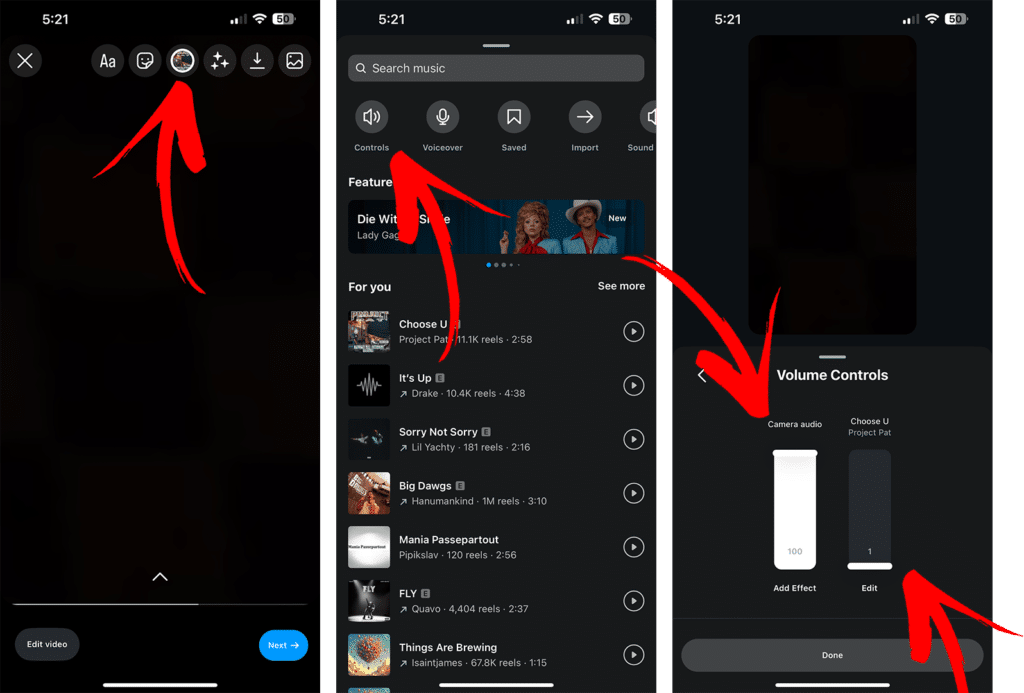
Step 5: Adjust the Volume Controls
To preserve your video’s carefully edited audio, tap the “🎵” icon again. Then, hit “Controls” to access the audio settings:
- Turn Original Audio Back Up to 100%: This keeps any dialogue, sound effects, or music you synced during editing loud and clear.
- Bring the Added (Instagram) Audio Down to 1%: Lowering the Instagram audio to 1% lets you use trending sounds while keeping your own audio front and center. This way, you’re still using Instagram’s music feature without overshadowing your carefully crafted audio.
Step 6: Finalize and Share Your Post
Once you’ve adjusted the audio settings, finalize any other details for your post. Add captions, tag people, and choose your hashtags. When you’re ready, hit “Share.”
By following these steps, you’ll avoid common pitfalls like having your video muted or removed due to copyright issues. Plus, you’ll make sure your reel gets the attention it deserves by using trending audio the right way.
Conclusion
Getting your audio right on Instagram might seem like a small detail, but it’s crucial for driving traffic and boosting engagement. By taking a few extra minutes to follow these steps, you’ll keep your video sounding great and in line with Instagram’s guidelines.
If you want to focus on your business while we handle the creative magic, tap in with the pros at Nacho Agency. We’ll create content that’s sure to hit the spot!Happy posting!